Key Highlights
Here are the key takeaways from our guide to beautiful hand embroidery:
- Master the satin stitch to fill shapes with a smooth, dense appearance.
- Use a split stitch to create a clean outline before filling, which helps define edges.
- Keep your stitch length consistent and choose the shortest direction across a shape for neater results.
- For curves, use guiding stitches and angle them to fan out smoothly.
- Selecting the right fabric and keeping it taut in a hoop is essential for clean stitching.
- Experiment with a different stitch, like the long and short stitch, for larger areas.
Introduction
Welcome to your guide on mastering shapes in embroidery! Filling in shapes with thread can seem simple, but achieving a smooth, professional finish requires specific techniques. This tutorial will walk you through the essential steps, from preparing your materials to executing the perfect stitch. Whether you're working on simple squares or complex curves, you’ll learn the stitching secrets to bring your designs to life. Get ready to elevate your embroidery skills and create stunning, beautifully filled shapes. If you're also interested in shaping your knitting as you follow a stitch pattern, pay close attention to how increases and decreases are incorporated into the pattern instructions. These techniques allow you to form curves, angles, or other desired shapes while maintaining the integrity of your stitch design. Always consult your pattern for guidance on where to shape and adjust your stitches for the best results.
Essential Tools & Materials for Shape-Based Embroidery

Before you begin stitching, gathering the right supplies is your first step toward success. You will need a few basic items: an embroidery hoop, a quality piece of fabric, embroidery needles, scissors, and your choice of floss or yarn. These tools form the foundation of any embroidery project.
Ensuring your fabric is "drum tight" in the hoop is especially important when filling shapes, as it prevents puckering and helps you create clean edges. The right needles and the number of thread strands you use will also significantly impact your final result. Let’s explore how to make the best choices for your project.
Choosing the Right Threads and Needles for Shaping Techniques
The threads you select play a major role in the final look of your embroidered shapes. The number of strands you use directly affects the texture and coverage. For instance, using more strands of yarn or floss will create a chunkier, more textured fill that covers the area faster.
Conversely, using fewer strands results in a finer, more blended appearance that can look incredibly smooth. While this method takes longer, it gives you greater control over the placement of each stitch. Consider the effect you want to achieve:
- Fewer Strands (1-3): Ideal for a smooth, satin-like finish with subtle blending.
- More Strands (4-6): Better for a bold, textured look and quicker filling.
Your choice of needle should correspond with your thread and fabric. A needle that is too large can leave holes in the material, while one that is too small can be difficult to thread and pull through. The right combination of needle and thread ensures each stitch lays flat and helps you control your stitch length for a neat finish.
Selecting Fabrics for Smooth Stitch Edges
The fabric you choose is just as important as your thread. For filled shapes, a tightly woven fabric like cotton or linen is your best option. These materials provide a stable and smooth surface that supports dense stitching without warping or puckering. A stable base is key to achieving those crisp, clean edges you're aiming for.
Always secure your fabric properly in an embroidery hoop. The material should be pulled taut, like the surface of a drum. This tension is critical; it prevents the fabric from distorting as you pull your thread through, which is a common cause of uneven satin stitches. If the fabric is loose, your stitches can sink or pucker, ruining the smooth effect.
When you work on your embroidery, be mindful of your stitch tension. Pulling the thread too tightly will cause the fabric to bunch up, while leaving it too loose will result in messy, snag-prone loops. A firm foundation and consistent tension are the secrets to flawless shape-based stitching.
Understanding and Outlining Embroidery Shapes

Before you can fill a shape, you need a clear guide. Outlining is a fundamental step in shape-based embroidery that provides a defined boundary to stitch against. This technique is especially useful for creating neat edges and is almost essential when working with irregular or asymmetrical shapes.
An outline acts as a small, raised barrier that your fill stitches can tuck against, hiding any minor imperfections and giving the shape more dimension. In this blog, we will explore how to first transfer your design and then use a specific stitch to create the perfect outline for any shape you want to embroider.
Sketching and Transferring Shape Designs onto Fabric
A successful embroidery project begins with a clear design on your fabric. Sketching your shape beforehand provides essential guidelines, helping you maintain the correct proportions and create clean lines. You can draw your design directly onto the fabric using a water-soluble pen or a sharp pencil.
If you are not comfortable drawing directly on the material, you can use a pattern. Print your design, place it against a light source like a window, and trace it onto your fabric. This transfer method ensures your shape is accurate, which is particularly important for symmetrical designs or complex, uneven shapes that require precise stitching.
Having these visible lines to follow makes the entire stitching process much easier. It allows you to focus on your technique, knowing that the boundaries of your shape are already perfectly defined. This simple preparation is a key part of any embroidery tutorial for a reason—it sets you up for success.
Using Split Stitch to Outline Curves and Irregular Shapes
What is a split stitch and how can it help you? The split stitch is a simple line stitch that is perfect for creating a solid, textured outline. To make a split stitch, you create a single straight stitch, bring your needle up through the middle of that stitch, and then make the next stitch forward. This process of "splitting" the previous stitch creates a strong, connected line.
This technique is incredibly effective for outlining shapes before you fill them. By creating a raised edge along the border of your design, the split stitch outline gives you a neat boundary to work against. When you later fill the shape with satin stitches, you can bring your needle up and down just outside this line, covering it completely for a crisp, defined edge.
This method works especially well for a curve or any irregular shape where maintaining a smooth edge can be challenging. The split stitch line provides stability and guidance, helping you control your fill stitches and achieve a professional finish, particularly at sharp points or along tight curves.
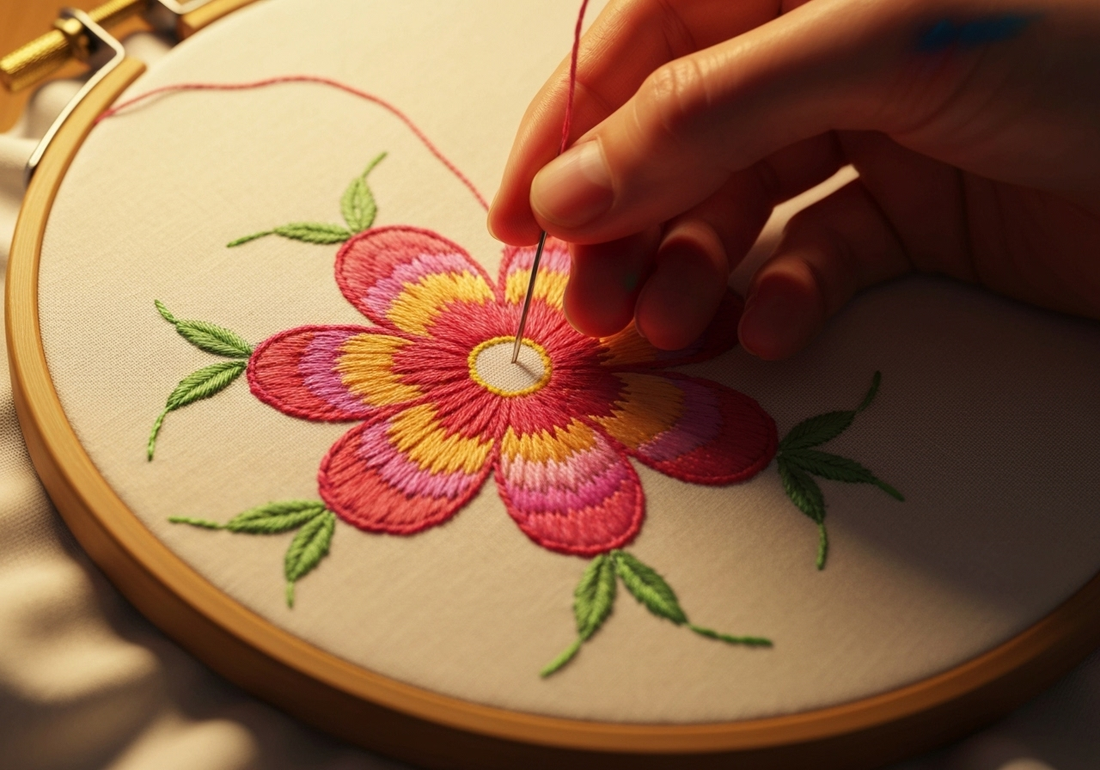
Satin Stitch Mastery for Filling Shapes
The satin stitch is a popular filling stitch used to cover shapes with smooth, parallel stitches that lay flat against the fabric. While it looks simple, mastering it can be tricky. The goal is to create a glossy, uniform surface that resembles satin fabric, but achieving this requires careful attention to stitch length and placement.
This stitch is most effective for small areas, as long stitches can become loose or snag easily. If you are working on a larger shape, you may need to break it into smaller sections or consider using a different stitch. In the next sections of this blog, we’ll explore techniques to help you master the satin stitch.
Techniques for Satin Stitching Smooth and Even Edges
To achieve a flawless satin stitch, start by making a single straight stitch across your shape. For symmetrical shapes like squares, you can begin at one edge. For other shapes, starting in the middle can help you establish the correct angle for your stitches. Place each subsequent stitch directly next to the previous one, ensuring they don't overlap or leave gaps. Keeping your stitch length consistent is crucial.
Don't pull the thread too tightly; the stitches should lay smoothly on the fabric without causing it to pucker. Working each stitch in the same direction, such as bottom to top, also helps maintain uniformity. If you struggle with keeping your stitches straight, try an alternative method where you place evenly spaced guiding stitches across the shape first and then fill in the gaps.
This table compares the two primary methods for applying satin stitch:
|
Traditional Method |
Spaced Guideline Method |
|---|---|
|
Stitches are laid one by one, side-by-side, from one end to the other. |
Initial stitches are placed evenly across the shape to act as guides. |
|
Can be difficult to keep stitches parallel on larger or irregular shapes. |
Helps maintain a consistent angle and direction across the entire shape. |
|
Works well for small, simple shapes like rectangles or squares. |
Excellent for beginners or anyone struggling with slanted stitches. |
Tips for Satin Stitching Around Curves and Asymmetrical Shapes
Stitching a curve or an asymmetrical shape with satin stitch requires a different approach than working on a simple square. How do you handle these more complex forms? The key is to adjust the angle of your stitches gradually. Instead of keeping them all parallel, you will need to "fan" them out, so they are closer together on the inside of the curve and farther apart on the outside.
To maintain control, place a few guiding stitches along the curve first. This breaks the area into smaller, more manageable sections. You can then fill in each section, following the angle set by your guides. This prevents the stitches from becoming too long or slanted. When you reach tight points, use a very short stitch to maintain the shape’s integrity.
Here are a few quick tips for stitching curves:
- Work stitches at a diagonal across the shape, as this can create a smoother appearance.
- Make one central stitch first, then add stitches to either side, slightly overlapping them at the base to create a fan effect.
- Always bring your needle up and down just outside your split stitch outline to hide it and create a clean edge for the next stitch.
Conclusion
In conclusion, mastering shape and stitch techniques in embroidery opens up a world of creativity and precision. By understanding the essential tools, selecting the right materials, and perfecting your stitching methods, you can elevate your embroidery projects from simple designs to intricate masterpieces. The skills you acquire will not only enhance the aesthetic quality of your work but also boost your confidence as an artist. Remember, practice makes perfect, so don’t hesitate to experiment with different shapes and stitches. If you're eager to refine your skills further, consider joining our community for more tips and resources. Happy stitching! For those interested, an X-shaped single crochet stitch is created by working into the stem of the previous stitch, which causes the legs of the new stitch to cross and form an 'X.' This distinct stitch is commonly used for textured patterns, decorative accents, and to add visual interest in both crochet and some embroidery projects.
Frequently Asked Questions
What’s the difference between satin stitch and long and short stitch for shaping embroidery?
Satin stitch uses parallel stitches of the same stitch length to create a smooth, glossy fill, best for small shapes. Long and short stitch uses interlocking stitches of varying lengths, which is better for filling large or irregularly shaped areas and for blending colors.
How do I achieve clean thread starts and finishes in stitched shapes?
For clean starts in your stitched shapes, use anchoring stitches or a waste knot away from your design instead of a bulky knot. To finish, weave the end of the thread through the back of several stitches on the reverse side of your embroidery before trimming.
What is Stitch N Shape and how is it used in embroidery and fabric crafts?
Stitch N Shape is a brand of firm, flexible, sew-in stabilizer. In fabric crafts and embroidery, it is used to add body and structure to projects like fabric bowls, boxes, and bag bases. You can stitch directly through it to create three-dimensional.